Saturday, December 14, 2013

(51620 mi) Slow Oil Leak... a gasket perhaps?

For awhile, the Chrysler has been experiencing a slow leak in oil.  It always showed after a long run and always on the pavement.  Examining the engine, the source of the leak never seemed obvious.  Was it the oil pan plug? Was it the full flow oil filter?  From where was it issuing?

While developing the modeled interior of a functioning L-Head engine, it occurred to me that the source of the trouble may be the oil pump, more specifically the cover gasket.

In the end, I purchased a gasket online and replaced the old stiff rubber gasket with a relatively new and pliable one.  I checked the true flatness of the oil pump cover, and it was flat.  I proceeded to change the oil and filter just to cover all the bases.  With the adjustments to the wiring, I believe that we're ready for a test on the road.

Thursday, November 7, 2013

The Windsor Traveler


In the Windsor DeLuxe Traveler, Chrysler designers have created a body style of remarkable utility.  It is, first of all, a beautiful six-passenger Sedan.  In a matter of seconds, the rear seat cushion and seat back can be folded flush with the floor to make it a cargo carrier with an exceptionally large storage space.

Sunday, October 6, 2013

(51620 mi) Short Circuit Investigation...

Day One:
I disconnected all the devices off the 30 amp fuse which include the headlights, map light, and stop lights.  No change in the car's behavior. Ammeter flickers, and car won't start.


Day Two:
Nothing works.  No flicker in ammeter.  Nothing.  Battery tests fine.  Full charge. 
 Jumped the car to turn it over, and it behaved normally.  Mystery!
Tested main line entering interior.  No reaction.  No electricity apparently flowing through wire.  Unwrapped the wire from an interior loop, and it worked!  Was it an interior short in the wire?  Maybe in this instance when no power was reaching any part of the car.

Day Three:
It's possible that I mis-wired the system.  It looks as though the I ran the power through the fuse before the ammeter, but the fuse should never have been involved.  There is not absolute certainty.  Many wires are still exposed for continued examination.  Tomorrow's run to Disneyland will be a good test.

Day Four:
It is confirmed.  The power to the ignition was being run through the 30 amp circuit breaker, which was a mistake that resulted in weird behavior by the car.  Live and learn!

Saturday, September 7, 2013

(51620) Massive SHORT Circuit!

While driving back from a Malibu beach at dusk, I heard a strange noise coming from behind the dashboard.  CLICK...buzzz...CLICK...buzzz...CLICK.  Over and over again.  I then also noticed that my lights went out and later discovered that the brake lights were gone too.  After many, many warnings from fellow motorists about my lightless condition at sunset, I finally reached home.  While the engine was idling properly, the rest of the electrical system was out.  Having no interest at the time, I left it for later.

Thankfully, my Service Manual has a rather thorough circuit diagram to help the service man repair the electrical system, and it looks something like this:
However, I thought that the diagram was rather hard to read, so I improved it.
If you note the red line leaving the STARTER RELAY, it leads to the ammeter, which then distributes the power to the rest of the system.  After removing that line, the short circuit was gone.  I am assuming that the short is hiding under the dashboard.  *SIGH*  After some careful photography and shoving my huge head into the space, I might be forced to disassemble the dashboard.  I hate disassembling the dashboard.  

Saturday, July 27, 2013

Summer Supplanting the Chrysler Desire...

With the onset of summer, the beach has beckoned me each weekend, leaving the poor Chrysler to the garage.  While I could drive the car to the beach and other fun summer destinations, the expense, the parking, the traffic would make the effort less enjoyable.  When I'm not beach roving, I have been creating 3D models of various mystery parts.  These parts are usually the ones I would replace without examining them closely because they are factory sealed.  Well, I'm breaking those seals and discovering the inner workings.  My first victim was the Autolite Horn Relay - RAF-4001.

Friday, May 17, 2013

(49122 mi to present) Stupid, stinking electrical short...It MUST be gremlins...

I've been replacing all the electrical motors, solenoids, wiring, and gauges in a slow and expensive attempt to locate a short in the system.  The car will start fine for multiple starts, long drives, and short hops under any weather conditions.  Then, without apparent cause, the whole system will go down, no lights, no starting, nothing.  The solution is an easy disconnect from the battery, and usually the car starts again.  Occasionally, I have to do it twice, but what a bother it can be!

There are other symptoms.  Driving down the road, we'll get a concerned citizen flagging us down from their vehicle to inform us about the right rear brake light not functioning.  We have stopped and verified it.  As soon as I return to fix the problem, it is working again.  I've also noticed that the gas gauge goes wonky once in awhile too.  It appears to be showing the proper fuel level, but I may just be receiving the appearance of a full tank without it actually being full.

I'm running out of things to replace and will have to commit to an entire body long search, following every wire and testing every component.  Before I do that, however, I intend to have the starter rebuilt.  It can't hurt anything more than my pocket book, which already strains for many other reasons.   The upside to the car trouble is the fuel savings.  The car is not running, and the exorbitantly expensive fuel is not being consumed ($4.07/gallon).

Tuesday, April 30, 2013

The Windsor Newport

CHRYSLER INTRODUCED the Newport body style shortly after the war and it has since become a very popular body type among the old and young alike.  The CLEARBAC rear window, the roll-down side windows, and the wide windshield give open car vision and freedom with the safety of the Sedan.

Thursday, April 25, 2013

The Windsor Convertible Coupe


As THE YOUNGSTERS would say . . .  "What a dream-boat," and we follow with "What a dream to drive"!  The Windsor DeLuxe Convertible Coupe . . . one of the smartest and most beautiful cars you ever laid your eyes on . . . with performance that will open your eyes and make you say "that's the car for me"!

Sunday, April 21, 2013

(51305 mi) "Poor Adjustment" - The Squeak Revealed

Poor adjustment refers to the clearance of the pad from the brake drum; in the case of the C-51 Chrysler Windsor, it is 0.006 inches.  Six thousandths of an inch requires a particularly exacting tool to ensure that the heal and toe of the pads hit the brake drum equally.  What is the heal and the toe of the brake pad?

The only effective way to illustrate is offering a page out of the 1951 Chrysler Shop Manual, page 56. (see below).  The toe of the brake pad is closest to the wheel cylinder.  The method for using the MT-19H tool requires repetition.  First you adjust the toe then the heel and repeat.   You can spend some time going back and forth between adjusting the heal and toe until the pad appears to be reasonably even and round.

Once you have the whole thing adjusted, it may still need final adjustment on the car.  It becomes especially apparent when the brakes pull to one side or the other.  

I had another particular problem with the adjusting cam - the bolt and pin turned but the cam did not.  It was an interesting problem.

Someone had originally tack welded the cam to the pin, which worked fine until the weld broke.  I tried the same technique but used epoxy to secure the pin to the cam.  That worked like the tack weld.  My most recent attempt included a torch and a hammer.  There is no assurance that it'll work any better.  However, I plan to replace the drum brakes with disc brakes soon.  It is a large expense, but well worth the trouble if I plan to keep the car.  

After twenty years, I plan to keep the car until I can't see the road anymore.


(51305 mi) Adjusting the brakes OR How to take the SQUEAK out

One of the most identifying feature of an poorly maintained car is brake squeal, in my opinion.  It is a matter of utmost concern when I hear my car reach a stoplight with a strong announcement and wary pedestrians pass quickly to avoid the possibility of being a run-over victim.

Leaking brake fluid can be a factor in noisy brakes, but a poor brake adjustment can produce both noisy and a car pulling to one side.  As it happens, I had both leaking and poor adjustment.  Naturally, I turn to TECH and the Master Technicians Service Conference for an answer.

Tech provides the answer with his usual brevity and recommends the proper order to check.

I already checked the second one first because I had a leak and rubber troubles.  Everything was torqued properly and tight as can be,  leaving the first and the third recommendation.

The third recommendation called "poor alignment" actually refers to how the brake pad hits the drum.  The perfect alignment is perpendicular to the surface of the brake drum.  Unfortunately, the position of the guide spring and the cam pin in the "support assembly" can affect how the pad interacts with the drum.  We are ignoring other small problems like a drum which is out-of-round (solved by a lathe.)
If there is cam pin which is too long, it means some grinding and adjusting, otherwise you get an irritating brake shudder.  If the cam pin is too short, you can live with it because the pad will right itself, but the pad will wear unevenly and shorten its useful life.  If you want to fix a short pin, you have to pound the pin from the backside, bending the support assembly well enough to push the pin towards the outside.

The second recommendation, "Poor Adjustment" is matter of using the right tool and having patience in producing the best result. It's worth a whole new blog entry.

(51297 mi) Leaks and a spongy brake (or don't reuse old rubber, stupid)

Hydraulic action is a pretty simple way to transfer force from a source to a destination, if you don't have any leaks or bubbles.  I had both.

The leaks came first and were caused by two factors: old rubber and stupid me.  "Stupid me" re-used the old boots on the wheel cylinders after I re-conditioned them.  They really did look supple and new when I decide to reuse them.  Unfortunately, after a trip across the country from Chicago to Los Angeles , they degraded.  "Stupid me" also didn't double-check all the hydraulic linkages for tightness.


"Cups-Old cups should always be thrown away when you're overhauling a system."p. 19, Master Technicians Service Conference,"The ABC's of Hydraulic Brakes", Vol 1, No. 8, 1948.


Replacing the rubbers was not a problem.  The brake pad adjustments are another story.

Sunday, February 24, 2013

(51295 mi) I should have known...Generator-Regulator

I often wonder why I wait for something to go wrong before I act.  I suppose that it's human nature.

Generator Regulator is a vital link to all things electrical in the engine of a 1951 Chrysler.  In fact, it can appear that everything is breaking down, electrically speaking, when it's only one nasty gremlin.  He was hiding in the Generator Regulator.

Looking back, I should have known.  The symptoms were clear:  (1) The Ammeter was showing constant charging at a constant rate; (3) a variety of electrical items would work and then not; and (3) light bulbs were being burned out.  My reaction to these occurrences showed a concentration on the symptoms.   I had supposed that the car waited too long a time in storage, and things were going awry from neglect.  Not so!  It was just one device.  Fortunately, the car received a complete re-wiring, brand new generator, new plugs, and new coil, as a result.  Hopefully we can consider this to be the end of the electrical breakdown, maybe.

Thursday, January 31, 2013

(51295 mi) Another tool in the battle against time and age...

"WITHOUT special service tools, many of today's commonplace service operations would not be practical to perform economically in most dealer service shops. Such tools are of low cost practical designs that allow a semi-skilled mechanic to accurately duplicate original manufacturing and assembly methods. These tools are developed in co-operation with the vehicle manufacturer's design and service engineers as an important aid for the dealer who must render dependable service for every unit of the car or truck. Thus, special service tools help .the dealer's shop turn out first quality service work at a fair price to his customers and earn the shop a satisfactory profit as well. Such special tools are usually provided by the dealership to supplement each mechanic's personal hand tools. These tools are effectively used by car dealers-fleet owners-independent service shops-mechanics-parts jobbers and
even some car or truck owners."

I have two of many special shop tools produced for Chrysler Motors by the Miller Manufacturing Company of the long-deceased Detroit, Michigan.  I received my second tool today!  It is gauge C-853!
Seen on the right, it gauges the positioning of the spring for the proper return of the clutch pedal.  My pedal has been misbehaving for about 15 years.  This gauge will put it BACK in line. :)

Saturday, January 26, 2013

(42002 mi) Seat Covers to cover the Seats.

 Re-Upholster OR Cover it Over?  If you are short on cash and can patiently examine eBay week after week, you can buy an original MoPAR Seat Cover.  As it so happens, that is what I did.


On May 2nd, 1951, Donald Motors of Tryon, North Carolina ordered my Seat Covers (Part No. 1315 347).  Obviously, they never reached the intended automobile, because 60 years later they covered the seats in my 1951 Chrysler.  Unfortunately, these seat covers are not actually designed for my particular car, but (without changing them a stitch) I have made good use of them.  The original upholstery is sadly advanced in its deterioration.  I have one last recourse in getting the right upholstery for the car.  I will have the fabric re-made... in the future.  When I have the money... maybe.

(00000 mi) All in the Family

Here's a partial view of my Chrysler's Family Tree in 1951.

Thursday, January 17, 2013

(00000 mi) Birth of my Car...

Using Fedco Numbering System for Chrysler cars in 1951 and my Vehicle Number, I have deduced that my car was born in September 1951.  Unfortunately, I cannot find more detailed information because it was generally not kept.  Let's see what was happening in 1951...shall we?

Wednesday, January 16, 2013

(51295 mi) The Parts Department - my closet.

A well-stocked parts department (known as my closet) is absolutely essential in maintaining your Chrysler.  Before the Internet, parts were found in the junkyard, really old parts stores with old stock, and the specialty  expensive purveyors of old and reproduction parts.  Ebay seems to have changed it all.  Combined with the closing of dealerships throughout America, NOS (New Old Stock) parts have flooded the market.  My collection looks like a 1950's parts department, and this pleases me to no end.  In fact, I have scanned the boxes and have printed stickers for those parts which do not have their original boxes.

Tuesday, January 15, 2013

(51295 mi) Disaster! Well...irritation...

Remember the post "The Car Won't Start! Auuuuughh!"?  Haha!  It happened again and under the same circumstances.  Darkness prevailed over the land, and the evil gremlin (shown on the right) decided to wreak havoc on my electrical system.  The naughty clue, which should have exposed the gremlin, (had I been aware) was the new headlamp's condition - burned out!  Why in the devil (or gremlin) would a brand new headlamp be burned out?  Voltage surge.  How would a gremlin create a voltage surge?  Voltage-Regulator!  So we consult the Chrysler Shop Manual and the Master Technician Service Conference booklet entitled "Special Reference to The Generator Regulator" (Special thanks to the Imperial Club, who's hallowed halls of knowledge have offered many an insight.)


    WHAT THE GENERATOR REGULATOR DOES
    The generator regulator has the job of controlling the flow (amperes) and pressure (volts) of the current put out by the generator, according to the needs of the electrical system of the car, and up to the rated capacity of the generator. It keeps the generator from putting out more current than is needed, which would overcharge the battery and shorten the life of distributor contact points, lights and other electrical units.


"Voltage regulator points which open at too high a voltage cause high voltage in the circuit. This may burn out the light bulbs and shorten the life of the ignition coil, distributor contact points and other electrical units. It burns up the guy who drives the car, too."

I'm especially feeling that last italicised and underlined statement.

Next step, test all the regulators according to the book to prove my hypothesis, i.e. gremlins and voltage regulators.


Tuesday, January 8, 2013

(51275 mi) Car Won't START! AUUGGGH!

After driving to the local Smart and Final, I went out to the car to drive home and nothing!  The car would do nothing.  The power worked, and the ammeter showed some huge draw on the battery.  When I turned the key, nothing happened.

There was absolutely no indication what was going wrong.  It was dark, and my passenger was Johnny-on-the-spot with a light produced from his phone.  We started disconnecting electrical parts.  Once we disconnected the generator, the power drain was gone.  Thankfully, I bought a replacement generator in expectation of this event.

Saturday, January 5, 2013

(49122 mi) Gee whiz! The car body is part of the Circuit!

   Way back in November 2012, I decided to tackle the immense job of re-wiring the Chrysler.  All the original cloth-covered wiring was disintegrating with the renewed usage, and the Los Angeles ozone probably didn't help either.  In any case, the wacky gas gauge convinced me that a re-wire was absolutely necessary to improve battery and sensory behavior.  I learned many new things about electrical systems on a car - the biggest revelation being the frame/boy is part of the circuit.  If any wire was exposed to the body without insulation, that wire was short-circuiting the system, and all hell could break loose.  
  The biggest problem was ensuring that only desired grounding occurred.  Surprisingly, grounding some parts of the car was harder than it should have been.   The positive cable off the battery leads to the engine block, which means that the car is a positive-ground system.  The 6-volt system also makes it a bit more twitchy than 12 volt cars, or so I've been told.   
   The illustration below shows the original schematic adjusted through Photoshop, and I included changes to the colour of the wire and its gauge.  Frequently, the gauge of the wire as appearing in the original manual was different than the wire gauge in the car.  I updated the information for my own purposes.  


Friday, January 4, 2013

A Close Look at 1951's

For those of you who doubt the quality and supreme vision of 1951, please examine this video and wish you were there.

(41900-51180 mi) Darn you! Automatic Choke!


The Automatic Choke... It has been my irritation and horror for many miles.  Right at the beginning of the trip to L.A., Jesse and I stopped for breakfast at Dixon, IL.  We tried to leave, but the car just wouldn't start.  At that point, I was so exhausted and coming down with a cold that I broke down and cried out, "I give up!"
  Shortly after, an older man showed up noticing the engine hood open and offered his assistance, which was gladly accepted.  In short order, he pointed out the problems and taught me a few common sense tips about engine diagnostics.  Then a quick turn of the key and VROOM! The engine came back to life.
  We tried to offer him breakfast, even some coffee for his assistance.  He would have none of it and disappeared as mysteriously as he showed up.  Later, Jesse and I decided that he was a guardian angel of the road (perhaps St. Christopher or so I think).
    Recently, the choke valve sneaks into a cold weather choke position and prevents ignition when the engine is cold but the weather is warm.  I have to loosen the choke housing and turn it back until the choke valve is vertical. Then the car starts immediately.

Thursday, January 3, 2013

(41912 mi) Re-PAINT!

Before leaving Illinois, my car needed a re-paint.  Unfortunately, I didn't have the $4000+ to have it properly stripped and re-painted, so Jesse and I bought a bunch of Rust-o-leum Gloss Hunter Green.
A few days before on a warm November and December day, I applied fresh paint with brush.  Succeeding days, I sanded and re-sanded the car surface.
For the final coat, we bought spray cans and tried to create a nice smooth surface for the final shine.  Overall, it wasn't a bad solution since the original paint had failed to cover the metal and protect it from oxygen.  Since that time, there have been no appearances of rust or any other failure.  Thankfully, Los Angeles cars live a long life on poor paint jobs, and my car doesn't stick out as much as I feared.   Still, the car needs a total strip and new paint job.  There's no city in the U.S. that could have a better opportunity for a new, quality, and cheap paint job.  Let's just say that immigrant labour is not too pricey.  :)
   I did a bit of a search to find the right colour for the car.  For instance, I have the color codes for lacquer and enamel specifically for the 1951 Chrysler (as shown below).  I even found out the Dulco (202-55818) and Dulux (181-10482) for the Continental Green Metallic, but not even that information was useful to find the right color in modern paint.
In the end, I just went to a automotive paint shop and examined the available colours and ended up with the code below.

(46115 mi) Blow-out on Interstate-5!


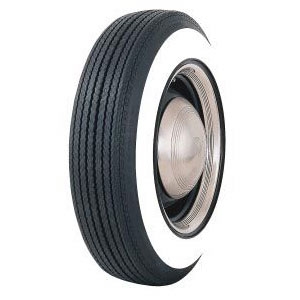
SKU:62800
Tread Width:5.63
Section Width:8.05
Overall Diameter:27.68
Construction:4 PLY POLY
Max Load Capacity:1620@32PSI
Recommended Rim Width:5.00 - 7.00
Tube Type or Tubeless:Tubeless


On my way south on the I-5, my car developed a weird bouncy wump-wump.  I slowed down and pulled to the shoulder to determine the source of the strange behavior.  Then suddenly at 20 mph, WUMP!  Blowout...

   I'm certainly glad that I noticed the odd behavior and slowed.  A blowout at 55 mph may have been a messy matter.  As it happened, it was a matter of 20 minutes of using the broken jack and jack stands to remove the blowout, replacing with the original 1951 Goodyear spare tire.  Obviously I did not choose to go very fast or very far on my antique spare tire.  Fortunately, Los Angeles County is a wonderland of Detroit diaspora.  In a short distance and with Jesse's help, we were able to find a Performance Plus Tire & Automotive Superstore.
   Not only was Luis Sierra and Performance Plus able to help us with replacing all the tires, but they had them in stock!  In a few short hours and a greasy-spoon luncheon, we were back on the road with brand new and economically priced tires.  The car never drove better!  We replaced the B.F. Goodrich tires, which took us across the country and were purchased in 2001.  Since the car originally came with the black wall tires like the original spare, I had the tire guys turn the black-side outward.  The car looks hella-cool!

Wednesday, January 2, 2013

(51180 mi) Distributor or Vacuum Advance Unit???

Since I had been playing with my carburetor, pulling it off and the on again, I had the opportunity to loosen a lot of tubes running to and from the carburetor.  As I started playing with the distributor, I noticed that the tube from the vacuum control unit to the carburetor was really very loose.  Could the strange acceleration behavior have been caused by poor vacuum advancing on the distributor?  Let's find out what the "Vacuum Control Unit" does! Shall we?

"Under normal road load or part throttle operation, the spark is advanced by the governor in proportion to speed. In addition, sufficient vacuum is created at the vacuum control unit to move the diaphragm and compress the spring in the unit. The arm of the vacuum unit is connected to the breaker point plate which rotates, causing additional spark advance for efficient fuel economy. " (p.225, 1951-52 CHRYSLER SHOP MANUAL)  So, it is entirely possible that part throttle or normal road loads required the vacuum control unit to engage and advance the timing appropriately.  If, however, I were always to put the pedal to the metal after each stop, the car would not have gasped and gurgled on acceleration, since the vacuum advance was not working properly.

In any case, it was a nice thing to clean everything out after the long trip from Illinois and learn a few new things about how my car works.